
Inrich
Fabric That Dances To The Music In Its Surrounding
Many of us appreciate only the audio aspect of music, while some can relate to it in visual or tactile forms.
The input in one pathway can trigger sensations in another, contributing to an enriched experience.
Fascinated by the cross-pollination of senses, I created Inrich, a silk installation that can dance to music to make music visible.
Independent Work | 2015 Skills: Interaction Design, Rapid Prototyping Tools: Arduino, Audio Analyzer
Research
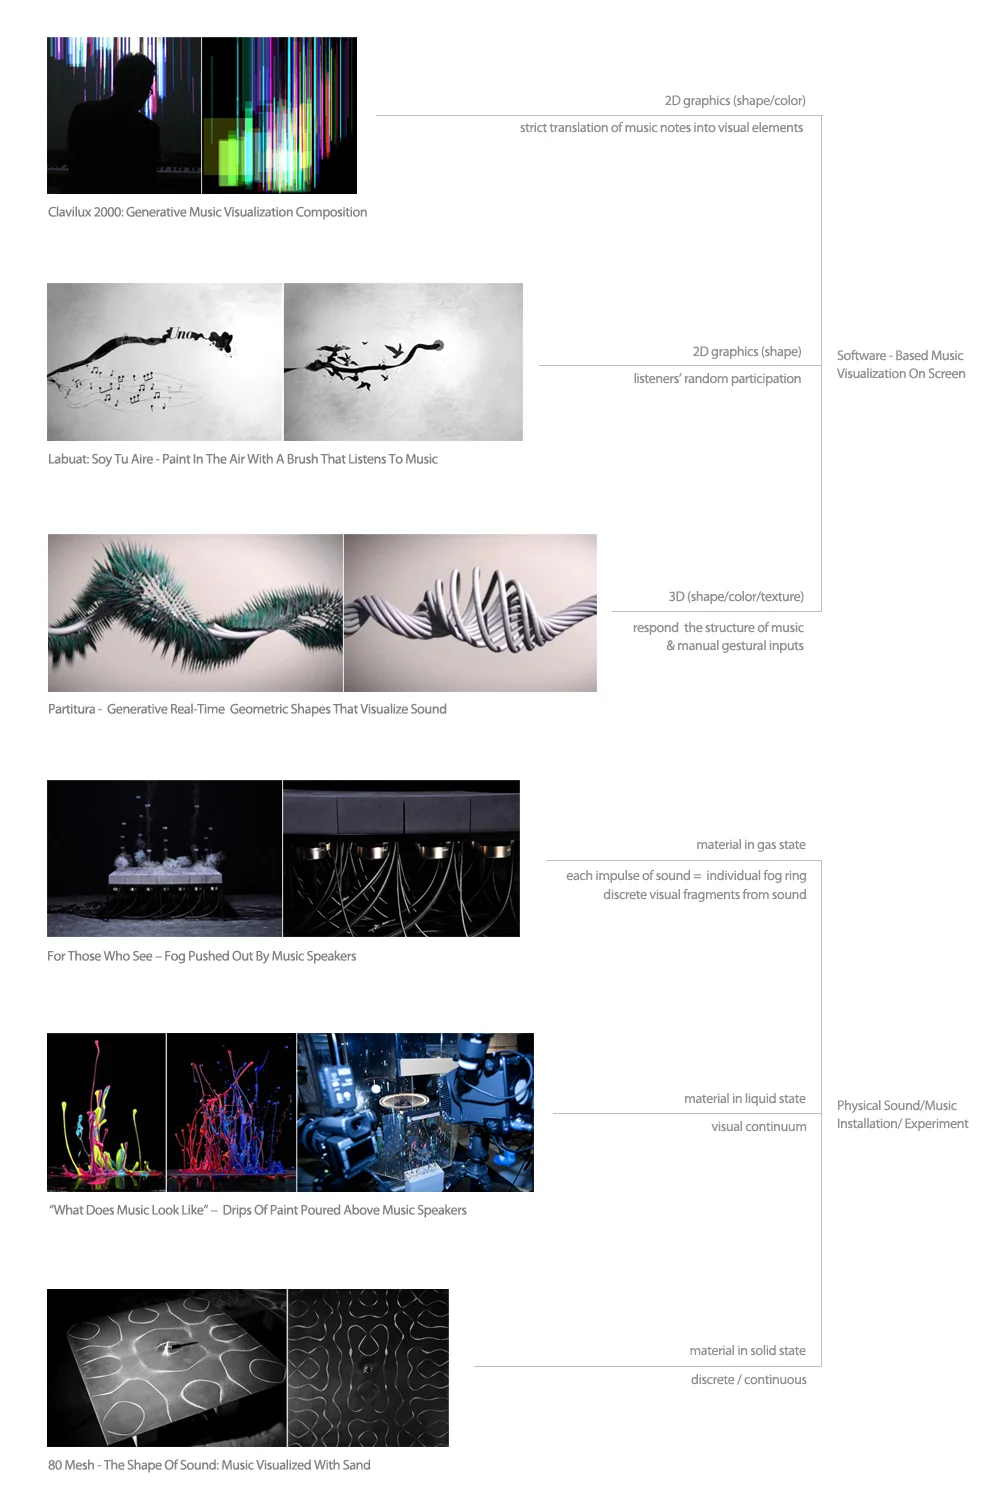
Many artists have done amazing sound installations or music visualization software that focus on the cross-pollination of the senses.
Some try to translate the playing of each note into a precise visual form in terms of dimensions, position, color and duration.
Others are less rigid, blurring the boundaries of different senses in search of new artistic expressions.
Inspiration
What if we go beyond the music itself, into a celebration that honors
both the music and the material that has been delicately chosen to "dance" to it?
Inspired by Cloud Gate Dance Theater, I chose silk as the material for its fluidity.

The final pitch was, a silk installation blown by Arduino-controlled fans that can reflect the rhythm of the music being played.
It looks like a ghost dancing to the music.
Other unused ideas included "trees" or "barley fields" that wave spontaneously according to the music they hear.

Technical Solution
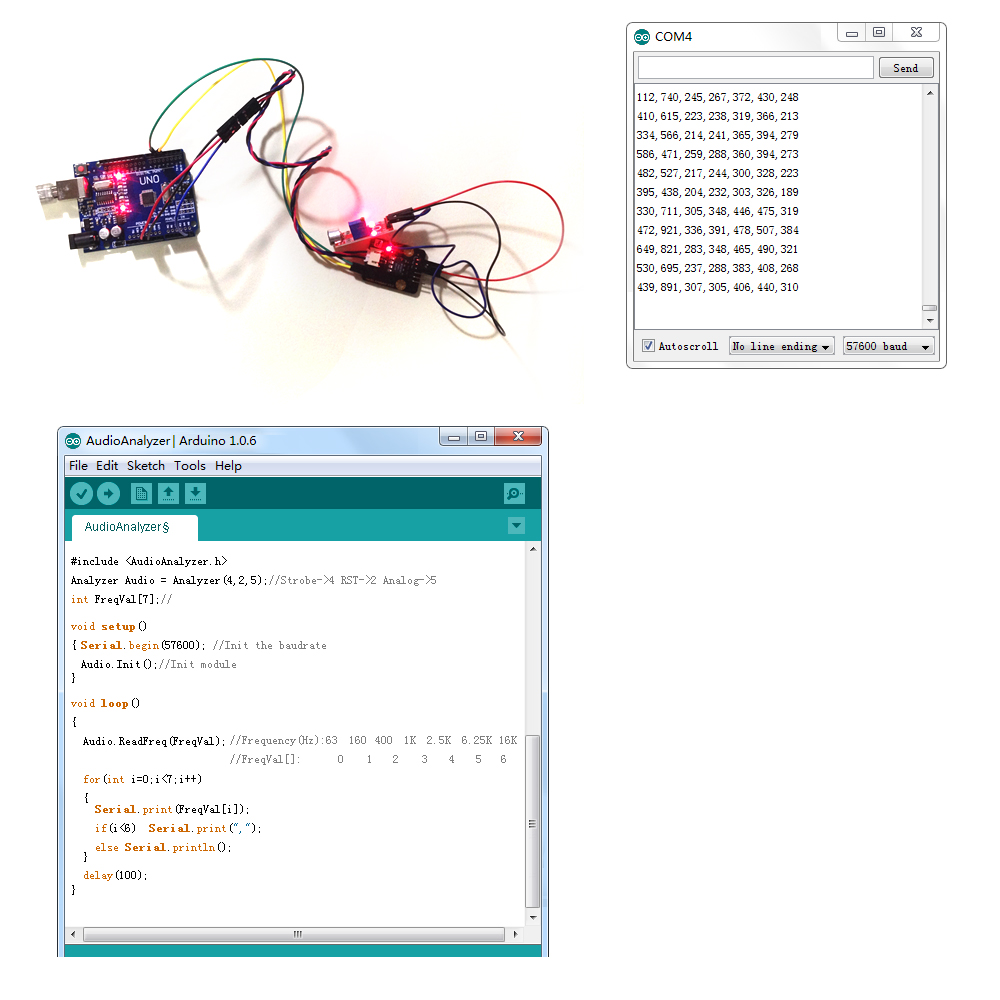
The DFRobot AudioAnalyzer module (+ MSGEQ7 graphic equalizer display filter) was used to break sound down into seven frequency bands
(63Hz, 160Hz, 400Hz, 1kHz, 2.5kHz, 6.25kHz, and 16kHz) and read the peak level for each band (microphone sensor KY-037 also needed).
Then the array data was sent to Arduino Uno, based on which Arduino controlled the speed of 6 PWM-controllable fans through the analogWrite(pinPWM, SpeedValue) function.

Making Process
(1) The original scheme involved 7 PWM-accessible fans (for the 7 sound values generated by the AudioAnalyzer module).
Considering that Arduino Uno only allows for 6-way PWM output
(digital pin3,5,6,9,10,11), and I didn’t want to complicate the system with additional PWM control boards,
the peak level value of 16kHz sound was ignored, hence the final version only included 6 fans.
(2) In the test flights, I tried controlling the fan speed with Arduino Uno.
The Foxconn PWM fan(12V 0.9A) has 4 pins, of which the yellow one can be floating pin.

(3) I also tried out the DFRobot AudioAnalyzer module and the microphone sensor KY-037 to make sure they work all right.
(4) Wiring was done according to the diagram before. The negative pins(black ones) of 6 PWM fans must be connected to Arduino GND,
since that is the only way to relate the signal coming into the base with the voltage on the emitter.

(5) The original Arduino sketch looked like this.
#include <AudioAnalyzer.h>
Analyzer Audio = Analyzer(4,2,5);   //Strobe pin ->4  RST pin ->2 Analog Pin ->5
int FreqVal[7];

void setup()
{
  Serial.begin(57600);  //Init the baudrate
  Audio.Init();    //Init module
}

void loop()
{
  Audio.ReadFreq(FreqVal);  //return 7 value of 7 bands pass filter
                                                 //Frequency(Hz):63  160  400  1K  2.5K  6.25K  16K
                                                 //FreqVal[]:      0    1    2    3    4    5    6

    analogWrite(3,FreqVal[0]*0.255); delay(500);    // transfer the band value into PWM speed value
    analogWrite(5,FreqVal[1]*0.255); delay(500);    // send PWM value to each pin to control each fan
    analogWrite(6,FreqVal[2]*0.255); delay(500);
    analogWrite(9,FreqVal[3]*0.255); delay(500);
    analogWrite(10,FreqVal[4]*0.255); delay(500);
    analogWrite(11,FreqVal[5]*0.255); delay(500);
}
(6) During the test, I noticed that one fan tended to run at higher speed than supposed, and this could be induced by loose connection.
So I welded the blue pin(speed control) of PWM fans to Arduino digital pin3,5,6,9,10,11 to avoid such condition.

Another problem was that certain fans (e.g. fan5) would always run at their maximum speed (or close) while others at their minimum.
In order to compensate for the difference in their band value,
I revised the Arduino sketch to make the fan speed more responsive to music input. Here is the revised sketch.
#include <AudioAnalyzer.h>
Analyzer Audio = Analyzer(4,2,5);   //Strobe pin ->4  RST pin ->2 Analog Pin ->5
int FreqVal[7];

void setup()
{
  Serial.begin(57600);  //Init the baudrate
  Audio.Init();    //Init module
}

void loop()
{
  Audio.ReadFreq(FreqVal);  //return 7 value of 7 bands pass filter
                                                 //Frequency(Hz):63  160  400  1K  2.5K  6.25K  16K
                                                 //FreqVal[]:      0    1    2    3    4    5    6

    analogWrite(3,min(FreqVal[0]*0.255,250)); delay(500);     // transfer the band value into PWM speed value
    analogWrite(5,min(FreqVal[1]*0.2,250)); delay(500);         // send PWM value to each pin to control each fan
    analogWrite(6,min(FreqVal[2]*0.33,250)); delay(500);
    analogWrite(9,min(FreqVal[3]*0.3,250)); delay(500);
    analogWrite(10,min(FreqVal[4]*0.28,250)); delay(500);
    analogWrite(11,min(FreqVal[5]*0.255,250)); delay(500);
}
(7) The installation is made of black silk hanging from a rectangular metal frame which itself hangs from two horizontal bars.
This structure makes the whole thing look like a ghost hovering and dancing in mid-air.

One bonus of this structure, is that we are allowed to adjust the look of the silk installation by moving the threads along the frame.
So even when the fans aren't working, the sculpture still contains infinite possibilities in terms of its look

What I learned
“Honestly, this piece has not fully met my expectation.
That is partly due to my inability to find an ultra-light and draping material,
and also the latency of a pheumatica actuation mechanism.
(Perhaps a smarter fan will help.)
In retrospect, I should have started with the material, instead of the mechanism.”
